Clause 3.12: How to achieve target attribute states and environmental outcomes

Once councils have set their TASs and the nutrient outcomes needed to achieve TASs, they must put in place methods to achieve these within the timeframes – refer to Clause 3.11: Setting target attribute states.
Clause 3.12 lists three methods:
Figure 5 outlines the process for achieving target attribute states and environmental outcomes.
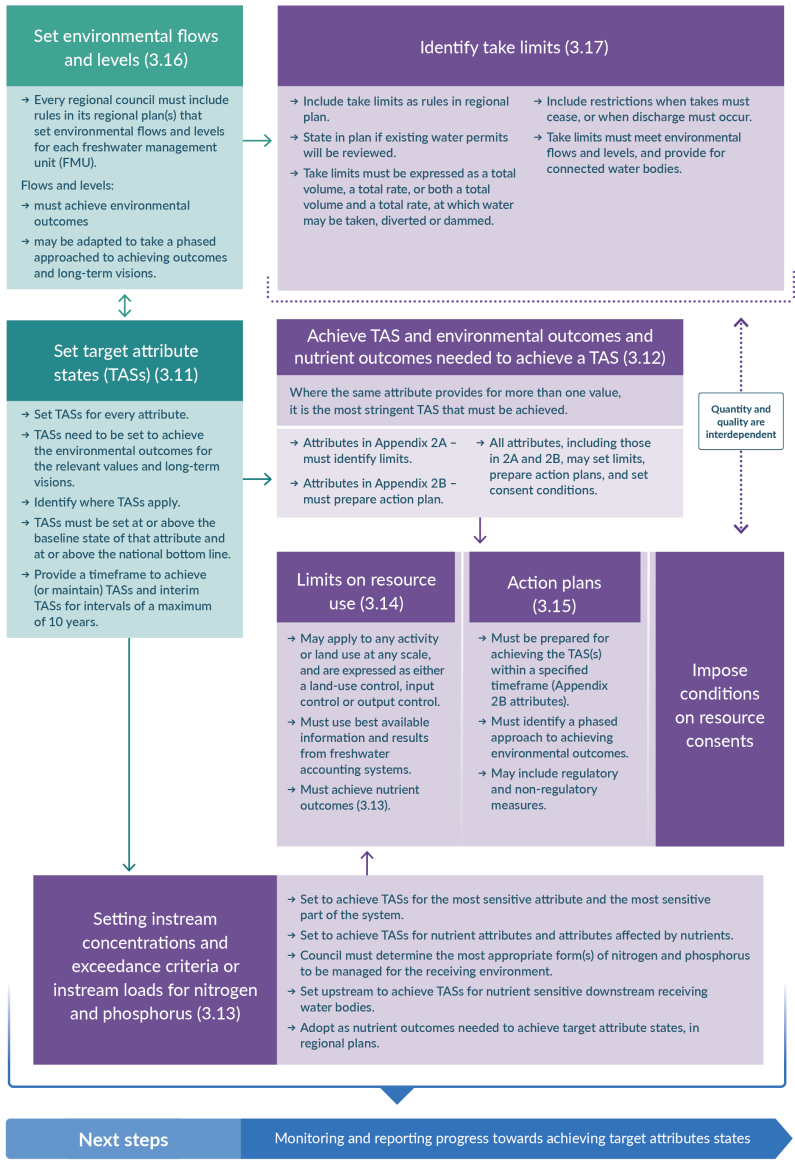
Multi-directional flow diagram showing how target attribute states and environmental outcomes are achieved, showing the connections between setting environmental flows and levels, identifying take limits, as well as limits on resource use, action plans and imposing conditions on resource consents.
Set environmental flows and levels (3.16)
There is a two-way arrow between this text box and the text box labelled ‘Set target attribute states (TASs) (3.11)’, showing that they are actioned at the same stage in the process.
This box ‘Set environmental flows and levels (3.16)’ then flows onto the next clause titled ‘Identify take limits (3.17)’.
Achieving TAS and environmental outcomes and nutrient outcomes needed to achieve a TAS (3.12)
Where the same attribute provides for more than one value, it is the most stringent TAS that must be achieved.
This box then flows down to provide more detail on ‘Limits on resource use (3.14)’ and ‘Action plans (3.15)’ and shows the option to ‘Impose conditions on resource consents’.
Limits on resource use (3.14)
Action plans (3.15)
Impose conditions on resource consents
Set target attribute states (TASs) (3.11)
A two-way arrow shows that this step occurs at the same time as ‘Set environmental flows and levels (3.16)’, as described above.
The box ‘Setting target attribute states (3.11)’ is then directed by two separate arrows to show the required pathways. One arrow flows across to ’Achieving TASs and environmental outcomes and nutrient outcomes needed to achieve TAS (3.12)’, and one arrow points down towards ‘Setting instream concentrations and exceedance criteria or instream loads for nitrogen and phosphorus (3.13)’.
Setting instream concentrations and exceedance criteria or instream loads for nitrogen and phosphorus (3.13)
This box then flows back up to details on ‘Limits on resource use (3.14)’ and ‘Action plans (3.15)’ and shows the option to ‘Impose conditions on resource consents’ when considering how to achieve TASs.
Next steps
Monitoring and reporting progress towards achieving target attribute states.
As shown in figure 5 there are specific minimum requirements for attributes in appendix 2A, appendix 2B and the attributes chosen by councils. Councils may always choose additional methods to support reaching the TASs and the nutrient outcomes needed to achieve TASs.
Setting limits: see clause 3.14 and section Clause 3.14: Setting limits on resource use of this guidance.
Action plans: see clause 3.15 and section Clause 3.15: Preparing action plans of this guidance. Councils must decide on the most appropriate method after engaging with the community and, for attributes affecting Māori values, in collaboration with tangata whenua. The decision must ensure the TASs are reached within the timeframes. It will be guided by assessment of the most effective and efficient method as required by section 32 of the RMA.
When an attribute provides for more than one value, the methods must achieve the most stringent one.
For nutrient concentrations and exceedance criteria for nitrogen and phosphorus, see clause 3.13 and section Clause 3.13: Special provisions for attributes affected by nutrients of this guidance.
In addition to the requirements in clause 3.12, there are other aspects to consider when choosing methods to reach a TAS.
The process of choosing (a set of) methods follows several steps. The aim is to come to a bundle of methods (including the required methods as per clause 3.12), that together achieve the TAS while fulfilling Te Mana o te Wai.
It is useful to do these steps in parallel for each TAS. Opportunities may arise for synergy, where a method for achieving one also contributes to achieving another.
These decisions should always:
This example follows steps 1 to 4.
Value: Ecosystem health
Environmental outcome for that value in that place: A thriving aquatic health that has high integrity of fish community, and with habitat and migratory access that has minimal deviation from their natural state.
Attribute: Fish index of biotic integrity (F-IBI)
TAS: To achieve an F-IBI of at least 34 (Band A) in identified rivers of high ecological value, by 2035.
The F-IBI attribute requires an action plan3.
Other methods that could contribute to achieving the TAS for F-IBI.
Determine for each method:
A conclusion could be that the TAS could be achieved by the following four combinations of methods:
Select a combination of methods to achieve this TAS for F-IBI.
Steps 1 and 4 are the most likely candidates to consider. Both provide for the health and well-being of the water body and the ecosystem. However, combination 4 allows for a less strict limit on water takes for the drinking water supply of the nearby town in times of drought. Combination 4 provides better for the health needs of people (second priority of obligations under Te Mana o te Wai) and is chosen over the other combinations in this example.
3 Fish IBI is an Appendix 2B attribute and as per 3.12 (2), in order to achieve the target attribute states for the attributes in Appendix 2B, every regional council must prepare an action plan for achieving the target attribute states within a specified timeframe.

Clause 3.12: How to achieve target attribute states and environmental outcomes
July 2022
© Ministry for the Environment